In a nutshell
- 🔥 Foil wraps reflect heat and lift rashers on ridges, accelerating rendering and evaporation so fat drains away—delivering restaurant-level crispness in about 10 minutes.
- ⏱️ Follow the 10-minute method: preheat grill/fan oven to 220–230°C with a hot, foil-lined tray; cook 3 minutes under a loose top sheet, then 5–7 minutes uncovered; rest 60 seconds and watch cues like subsiding bubbles and deeper colour.
- 📊 Know your timings: Grill (High) streaky 8–10 min, back 10–12; Fan oven 220–230°C 10–12/12–14; Air fryer 200°C 7–9/9–11—use top shelf and a perforated liner where relevant.
- 🛠️ Troubleshoot sogginess by spacing rashers and exaggerating foil ridges; pat dry watery packs, lower heat if edges burn, dust with rice flour for clean edges, and add pepper at the finish.
- 🍳 Elevate flavour and cut mess: brush maple/honey for Maillard, choose streaky for shatter-crisp or back bacon for chew, then wrap and bin cooled foil or save drippings—this method is scalable from one rasher to a crowd.
If your bacon at home limps when it should snap, you’re not alone. Restaurants rely on predictable heat, clever airflow, and hard-won technique. The killer move you can borrow is deceptively simple: aluminium foil wraps that turn an ordinary tray into a precision tool. By reflecting radiant heat, channelling fat away, and speeding evaporation, a foil setup accelerates rendering without drying the meat. Under a hot grill or in a fierce fan oven, it translates to restaurant-level crispness in roughly 10 minutes. No specialist kit. No smoky pan. Just a tray, two sheets of foil, and a plan designed for weeknight ease and weekend showmanship.
Why Foil Wraps Change the Game
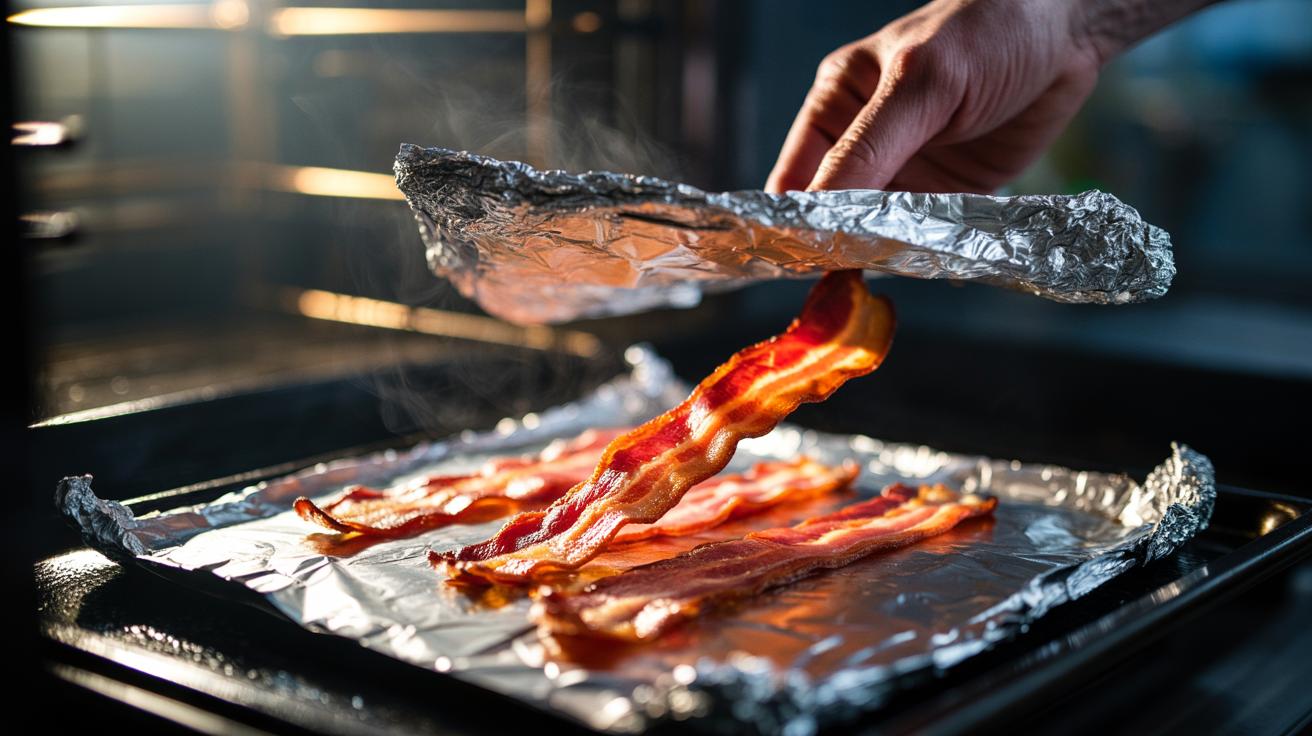
Think of foil as both mirror and scaffold. A foil wrap reflects high-energy heat back into the bacon surface, driving rapid water loss while fat liquefies and runs. Scrunched and reshaped, it forms ridges that lift the rashers, keeping them out of their own grease. This is crucial. Crispness happens when rendered fat drains away instead of simmering the meat. Traditional frying traps rashers in bubbling fat; they cook, but they don’t properly dehydrate. With foil, the physics swing in your favour.
There’s also speed. A preheated, foil-lined tray behaves like a hotplate, delivering instant sizzle the second the bacon lands. Add a loose top sheet of foil for the first blast and you supercharge evenness, especially with thicker back bacon. The modest cover traps just enough heat to kick-start rendering, then comes off so moisture can escape. The result is that elusive balance: glassy edges, mahogany colour, and a tender, meaty centre that still bites. It’s the clean, repeatable route to “chef’s special” crackle without specialist gear.
The 10-Minute Method, Step by Step
1) Heat matters. Set the grill to high or the fan oven to 220–230°C. Slide an empty, foil-lined tray onto the top shelf for 5 minutes. A hot tray is non-negotiable for instant sizzle.
2) Build the foil raft. Take heavy-duty foil, scrunch lightly, then smooth. Fold edges to make a shallow “wrap” and pinch in wavy ridges. Mist with a whisper of oil. The ridges keep bacon elevated; the valleys collect fat.
3) Lay rashers cold, not overlapping. For smoky lacquer, dust with a pinch of brown sugar or maple. Cover loosely with a second sheet of foil and poke a few tiny vents. Grill 3 minutes.
4) Whip off the top sheet. Continue 5–7 minutes, watching the last 90 seconds like a hawk. Rest 60 seconds on a rack or kitchen paper. This brief rest is when edges go from crisp to shatter-crisp.
| Setting | Streaky Bacon | Back Bacon | Notes |
|---|---|---|---|
| Grill (High) | 8–10 mins total | 10–12 mins total | Top sheet off after 3 mins; watch closely. |
| Fan Oven 220–230°C | 10–12 mins | 12–14 mins | Use top shelf; preheat tray well. |
| Air Fryer 200°C | 7–9 mins | 9–11 mins | Perforated liner; no top foil needed. |
Key cue: when bubbles on the surface subside and the colour deepens by one shade in 30 seconds, you’ve hit peak crisp. Pull them then; carryover finishes the job.
Troubleshooting and Pro Tips for Consistent Crunch
If bacon curls or burns at the edges, your heat is too intense or uneven. Slide the tray one rung lower and add a minute under the loose top sheet next time. Soggy patches? You likely overlapped rashers or skipped the ridges. Keep gaps between pieces and exaggerate the foil ridges so fat has somewhere to go. Remember, evaporation creates crispness; contact with pooled fat kills it.
Water-injected supermarket packs can sputter and steam. Pat dry. For ultra-clean edges, dust with a pinch of rice flour; it absorbs surface moisture and fries into a delicate crust. Prefer glassy shards? Choose streaky bacon and cook fast and hot. Want more chew? Go with back bacon and leave the top sheet on for an extra minute before finishing uncovered. A teaspoon of maple or honey drives Maillard browning; a black-pepper grind added at the end preserves fragrance. Cleaning? Let fat cool on the foil, wrap it, and bin or pour the liquid gold into a jar for frying eggs. Crisp bacon, minimal mess, repeat tomorrow.
Master the foil raft and you unlock timing you can trust, whether you’re stacking BLTs, topping a brunch plate, or snapping shards over a silky soup. The method scales from one rasher to a crowd, and it respects the meat: fast rendering, clean flavour, and that sought-after glassy edge. Once you’ve nailed your grill’s sweet spot, you’ll move by sound and sight, not fear. It’s ten minutes, a tray, and a little kitchen physics. What twist will you try first—maple-lacquered streaky, peppered back bacon, or a smoky rasher crumble over buttered greens?
Did you like it?4.5/5 (28)